

Customers
The Customers page is where you track and manage everyone who shops with your store. Open it from Customers in the dashboard sidebar.
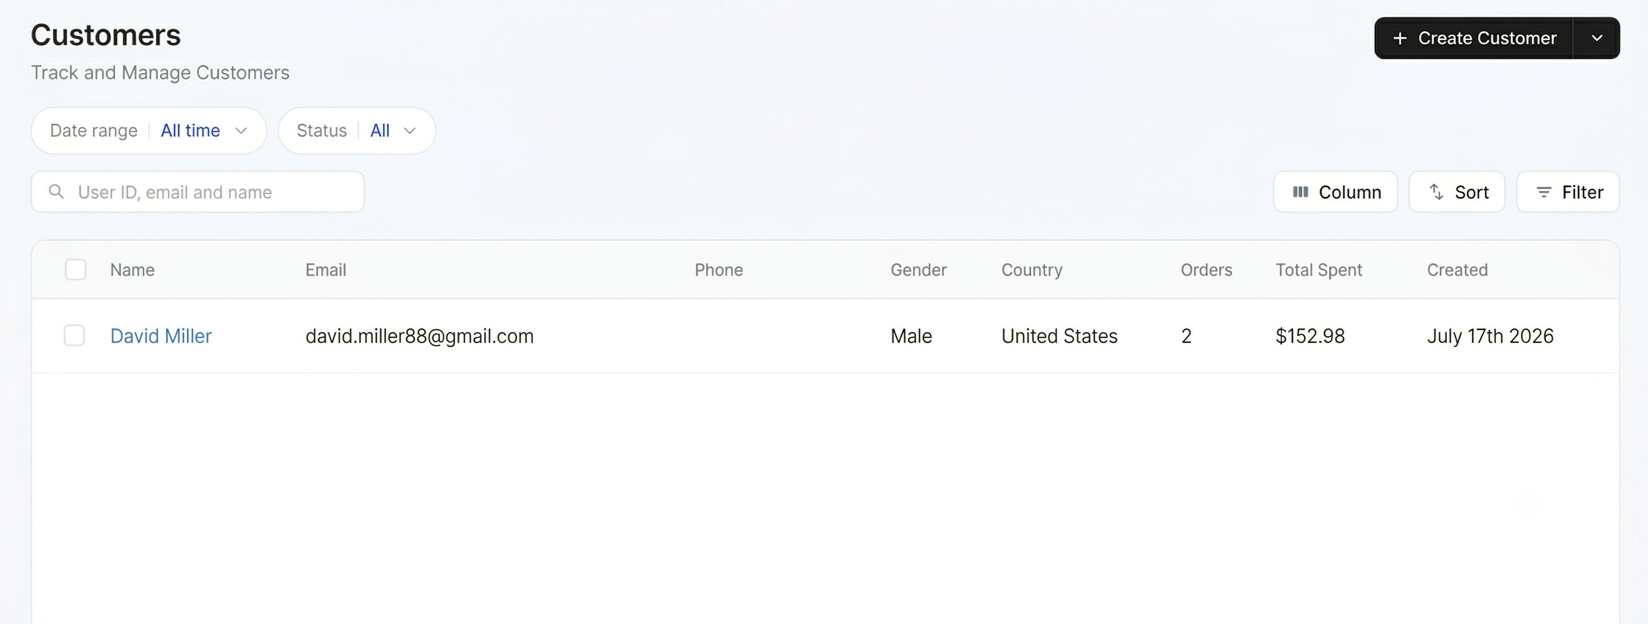
The customers table
Each customer appears as a row with these columns:
- Name, the customer's name (click it to open their details).
- Email, their email address.
- Phone, their phone number.
- Gender, their gender.
- Country, their country.
- Orders, how many orders they've placed.
- Total Spent, how much they've spent in total.
- Created, when the customer was added.
At the top you can also set a Date range, filter by Status, and click + Create Customer to add one manually.
Viewing a customer's details
Click a customer's Name to open the Customer Detail page, where you can see everything about that customer:
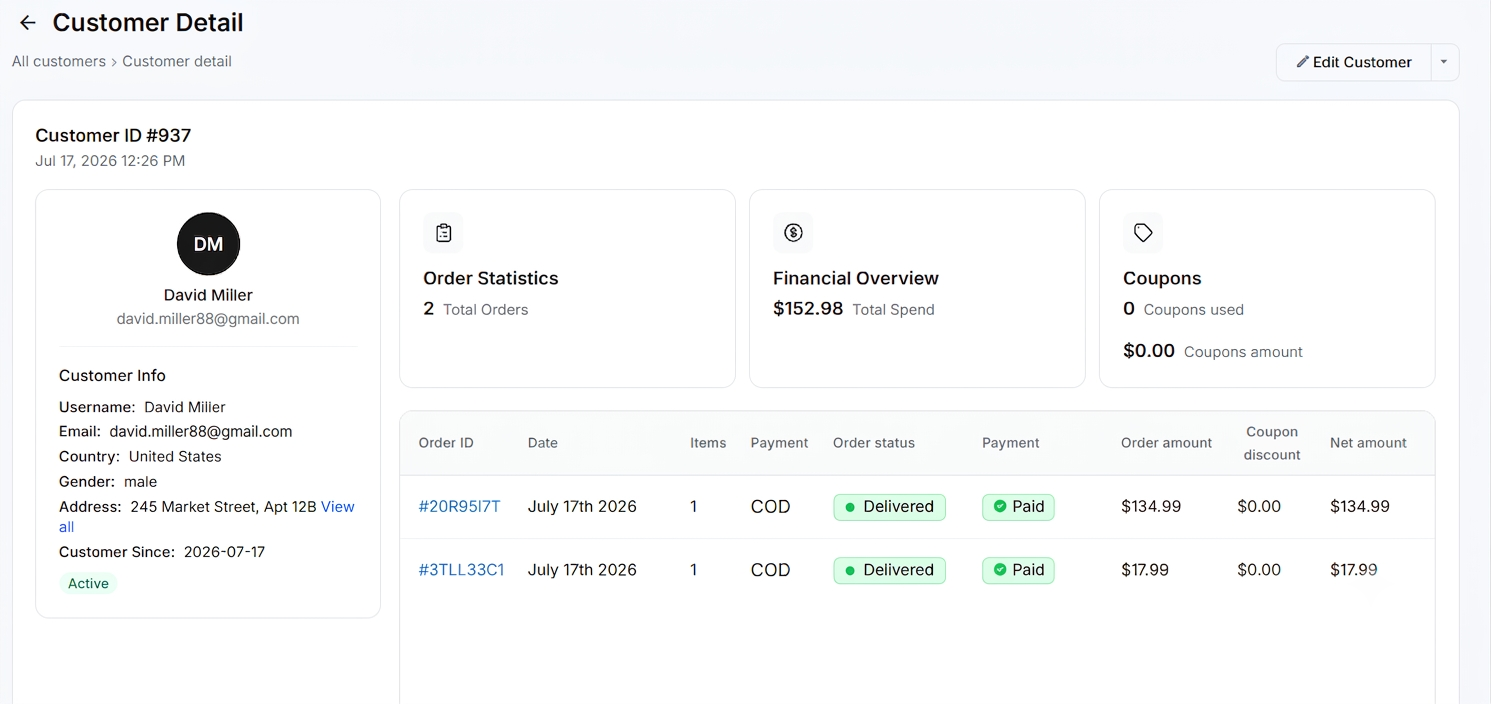
- Customer profile. Their name, email, and Customer Info, username, country, gender, address, customer-since date, and status (Active / Inactive).
- Order Statistics. The customer's total orders.
- Financial Overview. Their total spend.
- Coupons. How many coupons used and the total coupons amount.
- Order history. A table of the customer's orders, each with its Order ID, date, items, payment type, order status, payment status, order amount, coupon discount, and net amount. Click an Order ID to open that order.
- Edit Customer. Update the customer's details.
Customer actions
Next to Edit Customer at the top right is a dropdown (▾) with more actions for the customer:
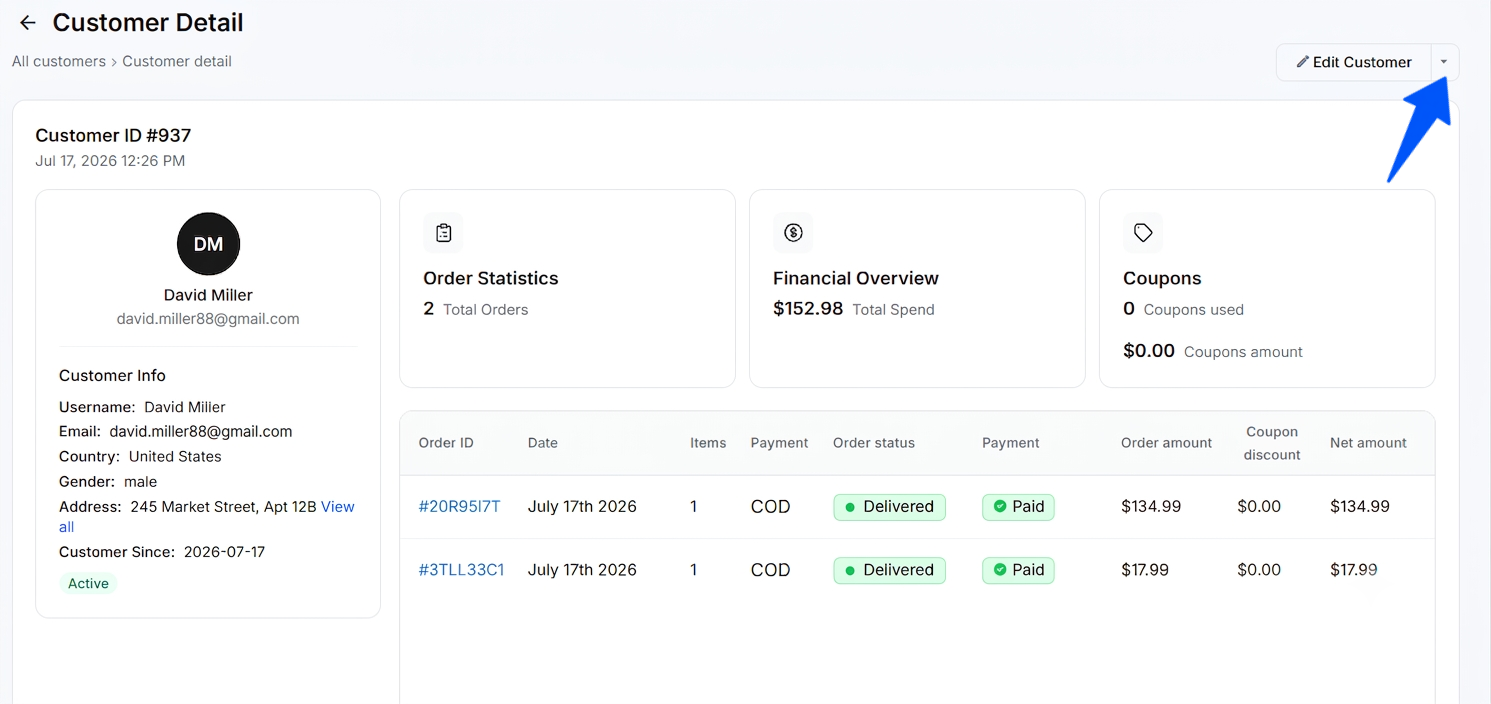
- Send Invite. Send an account invite email to the customer. They receive a reset-password link and can set their password from there to access their account. A confirmation asks "Send an account invite email to …?", click Yes, proceed.
- Block. Blocked customers can't sign in or place orders. You can unblock them anytime. A confirmation appears before blocking.
- Delete. Permanently deletes the customer and their data. A confirmation warns that this action cannot be undone, click Yes, delete to confirm.
Filtering by date range
Open the Date range dropdown to limit the list to a period, All time, Last 7 days, Last 30 days, Last 3 months, Last 6 months, Last 12 months, or a Custom range.
Filtering by status
Open the Status dropdown to show only certain customers:
- All
- Active
- Inactive
Searching customers
Use the search box (User ID, email and name) to quickly find a customer by their user ID, email, or name.
Choosing columns
Click Column to open Show or hide columns. Toggle any column on or off, Name, Email, Phone, Gender, Country, Orders, Total Spent, Created, and Status, to control what the table shows.
Sorting
Click Sort to order the list:
- Sort by, Customers (Created At), First Name, Last Name, or Email.
- Sort directions, Ascending or Descending.
Filtering
Click Filter for more precise filters on the customer list.
Adding a customer manually
Click + Create Customer to open the Add Customer form. Fill in the details and click Add customer at the bottom.
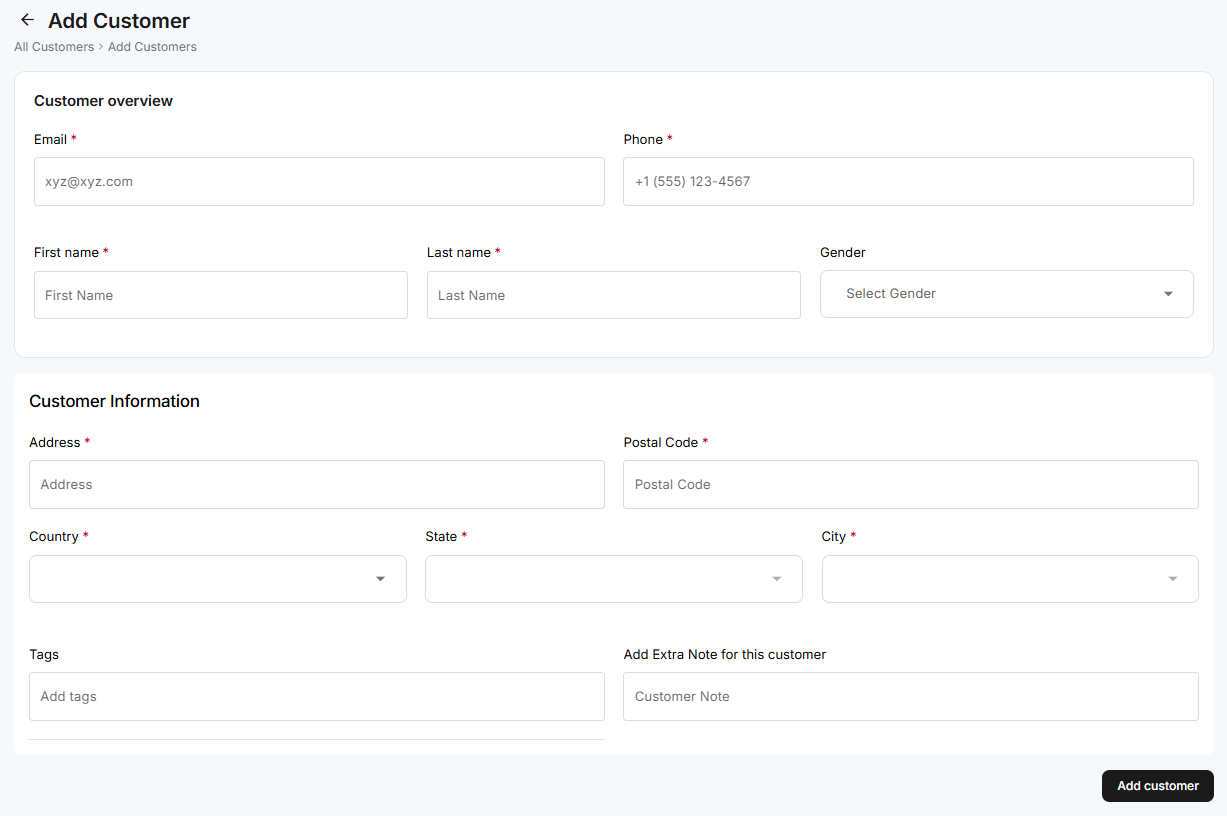
Customer overview
- Email (required) and Phone (required).
- First name (required), Last name (required), and Gender.
Customer information
- Address (required) and Postal Code (required).
- Country (required), State (required), and City (required).
Tags and notes (optional)
- Tags. Type a tag and press Enter to add it, the tag appears as a chip (for example VIP, wholesale, Repeat Customer). Add as many as you like.
- Add Extra Note for this customer. An internal note about the customer (for example Requested bulk discount for future orders).
Both Tags and Add Extra Note are optional, you can leave them empty.
Save
Click Add customer to create the customer.
Importing customers
To add many customers at once, import them from a CSV file. Click the dropdown (▾) next to + Create Customer and choose Import Customer.

Download the sample file
In the Import Customer dialog, click Download sample file. Build your CSV using the same headers and format as the sample, then fill in your customers.
Upload your CSV
Drag and drop your file into the upload area or click to browse. The file must be a CSV. The uploaded file's name appears once it's added.
Import
Click Import to add the customers to your store (or Cancel to go back).

CSV format
Your CSV must use these column headers (match them exactly):
| # | Header | # | Header |
|---|---|---|---|
| 1 | first_name | 10 | default_address_country_code |
| 2 | last_name | 11 | default_address_state |
| 3 | email | 12 | default_address_zip |
| 4 | accepts_email_marketing | 13 | default_address_phone |
| 5 | default_address_company | 14 | phone |
| 6 | default_address_address1 | 15 | accepts_sms_marketing |
| 7 | default_address_address2 | 16 | tags |
| 8 | default_address_city | 17 | note |
| 9 | default_address_province_code | 18 | tax_exempt |
Editing a customer
To update a customer's details, open their details page and click Edit Customer. The Edit Customer form opens, pre-filled with the customer's current information.
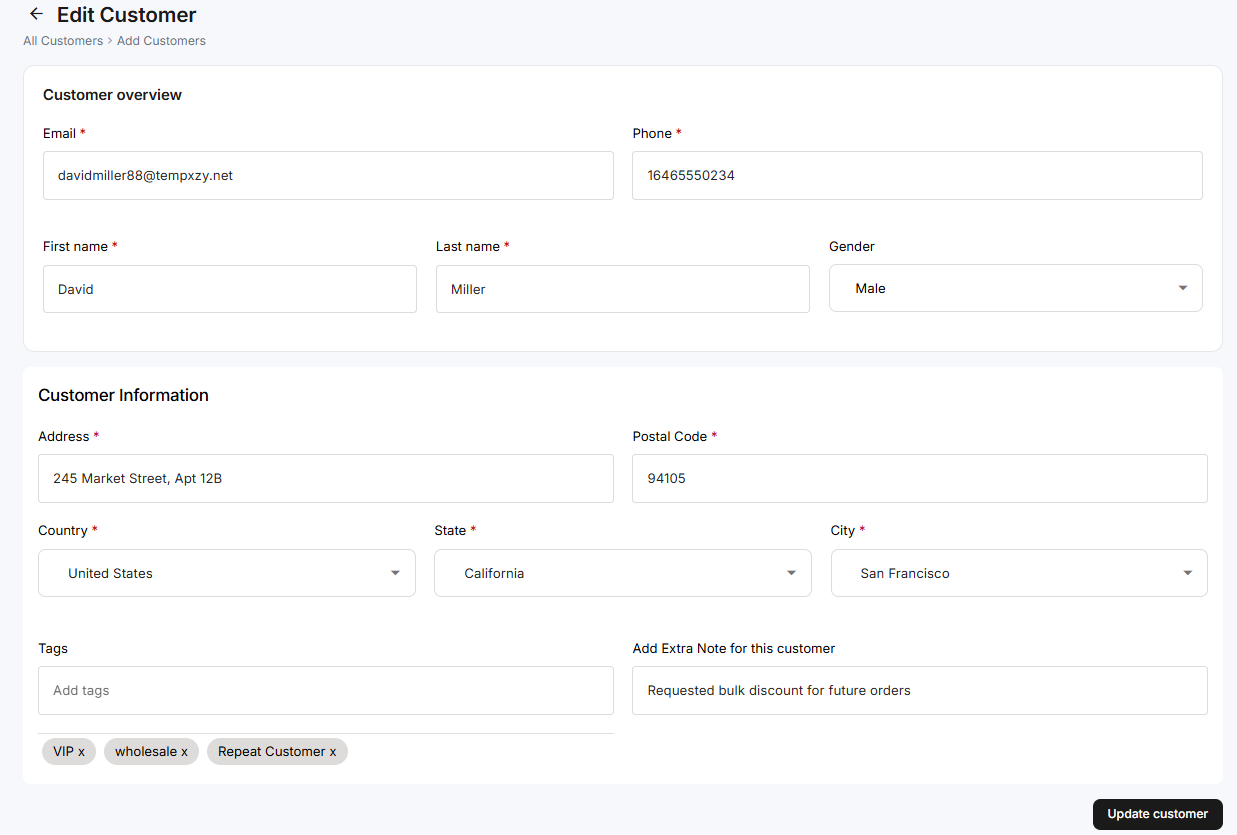
It has the same fields as the Add Customer form, edit any of them:
- Customer overview, Email, Phone, First name, Last name, Gender.
- Customer Information, Address, Postal Code, Country, State, City.
- Tags and Add Extra Note (both optional). Type a tag and press Enter to add it; click the × on a tag chip to remove it.
When you're done, click Update customer to save your changes.